Today I cleaned out my craft "closet." (I say "closet" because it's really a bookcase with numerous bins and boxes that function like a closet. At my house, things are seldom as they seem.) While this may not be an activity most people look forward to, I've been hankering after it for several days. Since today provided an extra day off work, it seems only fitting to do a little work of the non-paid persuasion.
Just to be clear, when I say "I cleaned out" something, it generally means that everything (and I do mean every little piece of ribbon, scrap of paper, and tube of glitter - wherever it may be hiding) must be removed from its container and resorted. (It seems I don't always put things back exactly where they belong - go figure.) This process is always lengthy - today I spent about four hours on it - but worthwhile. While reorganizing, resorting, redoing anything seems pointless to some, it frequently brings me joy. I play records (yes, I said records - those little vinyl things that spin at 45 revolutions per minute), sing loudly, drink coffee, laugh at old photographs, fill a large trash bag with dried up paint and scraps of paper that should have been tossed long ago, and drop tidbits on the floor for the cats to enjoy. (They are my constant companions in this type of endeavor. It seems they enjoy the sorting process as much as I and are heartily entertained by emptying and refilling containers.) By the time I finished, there was glitter to be vacuumed from the pooltable, bits of ribbon the cats had shredded, and a well-organized book shelf just begging for me to open a box and dive into a project.
Now, on occasion I have been called a neatness Nazi and characterized as ruthless and cruel when it comes to throwing away unused items. However, I must confess, that when it comes to craft supplies I soften. After all, one never knows when she will want that six-inch length of polka dot ribbon to adorn a card or that stack of patch pockets from old blue jeans to put on a set of placemats.
The world of crafting is a world of possibilities, and cleaning out craft supplies reminds me of all the wonderful items stashed away at my fingertips. The bright green paper and the flower stickers beckon me to create something happy. Even the darkest pieces - paper and photos - remind me to appreciate the sunlight. Sifting through a box of love letters makes me yearn to layer lace and pearls into something sweet and romantic. Each photo, a snapshot of a moment I can never have again, makes me smile, reveling in the happy journey that is my life.
Monday, January 21, 2013

A Taste of Something Different
From the outside Guru Palace is an unassuming storefront parked at the end of a strip mall featuring Trader Joe's and Michael's crafts with the usual mom-and-pop businesses that keep America running in between. At 5:30 on a Sunday evening, parking spots await right in front of the door, though by 6:30 patrons had to walk a little further. Upon entering, guests are greeted with an ornate (and probably hand-carved) solid wood swing to the left and a run-of-the-mill bar straight ahead. This contrast sets the tone for the physical establishment as well as the meal. Tables and chairs available at any restaurant supply store arranged in typical fashion adorn the left side of the dining area while alcoves with floors covered in pillows bedecked in rainbow silks, beading, embroidery, and gold trim live on the right side. Standard florescents are softened with fabric boxes that give a reddish hue to the light and a hushed feeling to an otherwise industrial room. The Indian tapestries and artwork featuring lush colors and glistening sequins create a sharp contrast to the scrubbed concrete floor.
In the moment our eyes took in these opposites and adjusted to the lighting, we were greeted with a friendly hello that began excellent service during our outing. Since I had perused the menu earlier in the day, I suggested to Jeff that we order a couple of the complete meals to sample a variety of dishes. We informed our server that this was our first trip to the establishment and that we lacked experience with Indian cuisine. He seemed excited to tell us about the dishes and he agreed that the meals - which came with an appetizer, several small entree selections, dessert, and Indian chai tea - were indeed the route to go. He even nodded approvingly when we voted for mildly spiced dishes, seeming to say that all novices should begin there. In an effort to help us, whenever a choice occured, he gave us some of each. For example, he brought both plain and garlic naan, and for dessert he ordered both a rice pudding and cake balls in rose syrup - but I'm getting ahead of myself.
Before the appetizers arrived, we were presented with a heavily peppered cracker bread and a thin spinach-based dipping sauce to cut some of the burn on the tongue. Next, the appetizers were placed between us. Since we had ordered a vegetarian dinner and a tandoori dinner, we had several morsels to sample. Our first bite of succulent garlic chicken with caramelized onions was deluxe. The subtle spices gave off a faitly exotic aroma that enhanced each morsel. The vegetarian plate included small bites of vegetables drenched in a spiced breading and deep fried, as well as a large samosa - a crusty dumpling filled with gingered potatoes and peas. These items sang when dipped in the accompanying fruit sauce (perhaps plum?).
When the tandoori entree arrived, sizzling and popping fresh from the flames, the aroma enveloped the table and piqued the senses. The plate, lined in more of those lovely caramelized onions, included a mix of sheesh kabab, tandoori chicken, lamb tikka, and a vegetable curry accompanied by basmati rice, raita (fresh yogurt with cucumber, tomatoes, and spices), and palak paneer (curry style spinach with fresh cheese and spices). The vegetarian plate included daal (a lovely, thick, spiced lentil soup), bengan bhartha (roasted eggplant that was to die for) and palak paneer accompanied by basmati rice and plenty of naan to soak up all the juices from the lentils and clean your plate after the eggplant. Needless to say, Jeff and I could not actually eat all of this food in one sitting, so (with the knowledge that dessert and Indian chai were still forthcoming) we (reluctantly) packed up the leftovers of our feast and gave our tongues time to recover. (The tandoori dinner was spicier than the vegetarian dinner, but the raita served as a cool respite to the dishes.)
After boxing up our remainders (which I might have for breakfast, soon) plates were cleared and chai tea presented. A couple of sips into the tea brought dessert - gulab jamun (two dense cake balls soaked in a chilled rose syrup) and kheer (a thin basmati rice pudding with almonds and pistachios). The rose syrup was sweet and subtle, giving a light floral scent that coupled well with the dense cake balls. (Jeff pointed out that they had the texture of small cake donuts, and we discussed how to replicate it at home.) The rice pudding, not as sweet as the gulab jamun, was delicious. Though thinner than any rice pudding I've eaten, the nuts added a nice contrasting crunch and the pudding itself had a smooth vanilla finish.
 As the splendid meal ended, we promised each other to return soon. (It looks like there is a buffet at lunch, and the tasting opportunities intrigue us!) In addition to the excellent food, we were treated to outstanding service - our glasses were never more than a third empty, food was delivered promptly, explanations were offered genially. Finally, our bill (before tip) came to $40 and change - a bargain for the amount of food and interest factor alone. All-in-all, dinner at the Guru Palace set the tone for a wonderful evening of entertainment at the Mesa Arts Center, where we saw Shatner's World - a one man show featuring an energenic William Shatner (who is about to turn 82!) who made us laugh and made us think about life, love, and what we do with our time on Earth.
In the moment our eyes took in these opposites and adjusted to the lighting, we were greeted with a friendly hello that began excellent service during our outing. Since I had perused the menu earlier in the day, I suggested to Jeff that we order a couple of the complete meals to sample a variety of dishes. We informed our server that this was our first trip to the establishment and that we lacked experience with Indian cuisine. He seemed excited to tell us about the dishes and he agreed that the meals - which came with an appetizer, several small entree selections, dessert, and Indian chai tea - were indeed the route to go. He even nodded approvingly when we voted for mildly spiced dishes, seeming to say that all novices should begin there. In an effort to help us, whenever a choice occured, he gave us some of each. For example, he brought both plain and garlic naan, and for dessert he ordered both a rice pudding and cake balls in rose syrup - but I'm getting ahead of myself.
Before the appetizers arrived, we were presented with a heavily peppered cracker bread and a thin spinach-based dipping sauce to cut some of the burn on the tongue. Next, the appetizers were placed between us. Since we had ordered a vegetarian dinner and a tandoori dinner, we had several morsels to sample. Our first bite of succulent garlic chicken with caramelized onions was deluxe. The subtle spices gave off a faitly exotic aroma that enhanced each morsel. The vegetarian plate included small bites of vegetables drenched in a spiced breading and deep fried, as well as a large samosa - a crusty dumpling filled with gingered potatoes and peas. These items sang when dipped in the accompanying fruit sauce (perhaps plum?).
 |
| Samosa and fried vegetables |
 |
| Garlic Chicken (We had a few bites before the photo!) |
When the tandoori entree arrived, sizzling and popping fresh from the flames, the aroma enveloped the table and piqued the senses. The plate, lined in more of those lovely caramelized onions, included a mix of sheesh kabab, tandoori chicken, lamb tikka, and a vegetable curry accompanied by basmati rice, raita (fresh yogurt with cucumber, tomatoes, and spices), and palak paneer (curry style spinach with fresh cheese and spices). The vegetarian plate included daal (a lovely, thick, spiced lentil soup), bengan bhartha (roasted eggplant that was to die for) and palak paneer accompanied by basmati rice and plenty of naan to soak up all the juices from the lentils and clean your plate after the eggplant. Needless to say, Jeff and I could not actually eat all of this food in one sitting, so (with the knowledge that dessert and Indian chai were still forthcoming) we (reluctantly) packed up the leftovers of our feast and gave our tongues time to recover. (The tandoori dinner was spicier than the vegetarian dinner, but the raita served as a cool respite to the dishes.)
 |
| Tandoori dinner |
 |
| Tandoori with basmati rice, raita, and palak paneer |
 |
| Palak paneer, bengan bhartha, and daal with naan and basmati rice |
After boxing up our remainders (which I might have for breakfast, soon) plates were cleared and chai tea presented. A couple of sips into the tea brought dessert - gulab jamun (two dense cake balls soaked in a chilled rose syrup) and kheer (a thin basmati rice pudding with almonds and pistachios). The rose syrup was sweet and subtle, giving a light floral scent that coupled well with the dense cake balls. (Jeff pointed out that they had the texture of small cake donuts, and we discussed how to replicate it at home.) The rice pudding, not as sweet as the gulab jamun, was delicious. Though thinner than any rice pudding I've eaten, the nuts added a nice contrasting crunch and the pudding itself had a smooth vanilla finish.
 |
| Indian chai tea |
 |
| gulab jamun and kheer |
 As the splendid meal ended, we promised each other to return soon. (It looks like there is a buffet at lunch, and the tasting opportunities intrigue us!) In addition to the excellent food, we were treated to outstanding service - our glasses were never more than a third empty, food was delivered promptly, explanations were offered genially. Finally, our bill (before tip) came to $40 and change - a bargain for the amount of food and interest factor alone. All-in-all, dinner at the Guru Palace set the tone for a wonderful evening of entertainment at the Mesa Arts Center, where we saw Shatner's World - a one man show featuring an energenic William Shatner (who is about to turn 82!) who made us laugh and made us think about life, love, and what we do with our time on Earth.
Sunday, August 21, 2011
Early Morning Sustenance
School is fully underway with a few changes to our schedule. This year Jeff is teaching an A hour class that begins at 6:40 a.m. and I'm working in the credit recovery program that gears up at 6:50 each morning. These early demands mean we have to be out the door by 6 a.m. instead of our usual 7 a.m. I'm not really a morning person these days, so the thought of getting up an hour and a half before leaving just didn't set well with me. (Normally we arose at 5:30 and left at 7.) So we decided that streamlining the morning routine would allow us to back up the alarm by only half an hour and still leave on time.
One place we've had to give a little time is breakfast. Traditionally, I made a quick breakfast of scramble eggs and toast or oatmeal with fruit, but the one hour time frame doesn't accommodate those tasks. To make sure breakfast is available on demand, I've begun making a week's worth on Sunday afternoon. The first week I stuck with tried and true - sausage and egg biscuits. My original intent was to buy a box of these little beauties in the freezer section and nuke them at will. However, when I saw the price (several dollars for two!) I decided to make my own, which turned out better than bought because I could add a little strawberry jelly to the biscuits providing something sweet to offset the spicy sausage patties. I also discovered that wrapping the sandwiches in parchment paper before stashing them in a plastic container in the fridge made them easier to pop in the microwave and carry out to the car for mobile consumption.
Last week I branched out a bit and made pigs-in-a-blanket breakfast style. I used sausage links and a couple cans of cinnamon rolls for the process, which was as easy as wrapping the coils of dough around two small turkey links before baking them in the oven. In the morning 20 seconds in the microwave made them perfectly edible.
This week I'm trying yet another variation. (My plan is to have at least five kinds of "sandwiches" through which I can rotate.) I began by popping 10 frozen waffles in the oven. (This ensured they were crispy and flat instead of soggy.) While these baked and cooled, I beat a softened package of cream cheese with a good deal of fig jam. (I just kept adding and tasting until I liked the balance.) Next, I spread the mixture (which would also be a great cake filling) on the waffles, being sure to fill all the little squares. After adding some thinly sliced ham (or use turkey breast) to five of the waffles, I covered them with the remaining waffles. Next, I cut all the sandwiches in half and wrapped them to create 10 breakfast goodies. I haven't warmed one up in the microwave yet, but the filling sure was good with a little left over ham. (Actually, I could see using this filling to create yummy appetizers like stuffed dates or ham rolls, or just eating it on a toasted English muffin.)
The goal, of course is to still have time for a decent breakfast even though we're starting our days earlier. After all, food is life.
One place we've had to give a little time is breakfast. Traditionally, I made a quick breakfast of scramble eggs and toast or oatmeal with fruit, but the one hour time frame doesn't accommodate those tasks. To make sure breakfast is available on demand, I've begun making a week's worth on Sunday afternoon. The first week I stuck with tried and true - sausage and egg biscuits. My original intent was to buy a box of these little beauties in the freezer section and nuke them at will. However, when I saw the price (several dollars for two!) I decided to make my own, which turned out better than bought because I could add a little strawberry jelly to the biscuits providing something sweet to offset the spicy sausage patties. I also discovered that wrapping the sandwiches in parchment paper before stashing them in a plastic container in the fridge made them easier to pop in the microwave and carry out to the car for mobile consumption.
Last week I branched out a bit and made pigs-in-a-blanket breakfast style. I used sausage links and a couple cans of cinnamon rolls for the process, which was as easy as wrapping the coils of dough around two small turkey links before baking them in the oven. In the morning 20 seconds in the microwave made them perfectly edible.
This week I'm trying yet another variation. (My plan is to have at least five kinds of "sandwiches" through which I can rotate.) I began by popping 10 frozen waffles in the oven. (This ensured they were crispy and flat instead of soggy.) While these baked and cooled, I beat a softened package of cream cheese with a good deal of fig jam. (I just kept adding and tasting until I liked the balance.) Next, I spread the mixture (which would also be a great cake filling) on the waffles, being sure to fill all the little squares. After adding some thinly sliced ham (or use turkey breast) to five of the waffles, I covered them with the remaining waffles. Next, I cut all the sandwiches in half and wrapped them to create 10 breakfast goodies. I haven't warmed one up in the microwave yet, but the filling sure was good with a little left over ham. (Actually, I could see using this filling to create yummy appetizers like stuffed dates or ham rolls, or just eating it on a toasted English muffin.)
The goal, of course is to still have time for a decent breakfast even though we're starting our days earlier. After all, food is life.
Tuesday, August 2, 2011
Looking for a Label
During back-to-school shopping today we purchased new dress shirts for Jeff, glasses and contacts for Jade, and a few jewelry trinkets to enhance my wardrobe. Try as we might, we had a difficult time buying American-made goods in these categories.
The only products we came home with that I'm certain were produced in the United States are the boy's contact lenses. Some online research this morning (before we left) indicated that many of today's disposable brands come from American facilities. Bausch and Lomb (founded in 1853), Johnson and Johnson (maker of my brand - Acuvue), and Cooper Vision all make their products in the U.S. of A. CIBA Vision, a company based in Switzerland, also has production facilities here as well as many other countries around the world. Thus, I knew we had scored one for the red, white, and blue when we left the house. However, the new glasses were another story entirely.
My online research yielded many companies that manufacture and distribute glasses frames and lenses, but most did not specify brand names. To compound the situation, the companies I read about also imported some brands and distributed those alongside their own products. Italy seems to be an especially popular country for eye wear exports to the U.S. In addition, none of the frames we looked at were marked with a specific company or country, (mostly because we didn't buy designer frames). Our assumption is that these frames were not created here, though we did purchase the glasses and contacts from Eye Masters, a private corporation based in San Antonio. (The company is a subsidiary of Eye Care Centers of America, which was founded in Texas in 1988.)
We finished glasses shopping feeling we had done our best to buy American, though we didn't really have enough information to guide us or enough choices to make the option feasible. Next, we spent some of our dollars on lunch at Panda Express (an American company that originated in California in 1973) and Steak Escape (an Ohio company founded in 1982). Both of these fast food joints are available at our local mall which, of course, employs our neighbors and students.
Next came shirt shopping for Jeff, but this portion of our day yielded zero satisfaction in the American-made department. Every dress shirt we looked at in J.C. Penney, Macy's, Dillard's, and Kohl's was made elsewhere - Taiwan, China, Bangladesh, Vietnam, Cambodia, etc. (At Kohl's I decided to browse through the women's clothes as well, but I couldn't find anything made in the U.S.A. - not even the Levi's which came from Mexico or Indonesia depending on the style. Lee jeans didn't present a better choice either, since they, too, came from overseas. As a matter of fact, every major jeans brand I looked at was made somewhere other than America - including Kenya, Egypt, Nicaragua, Bolivia, and Costa Rica.) Eventually, the necessity of having decent dress shirts for work won out over our frustrated endeavors to buy U.S. goods, but we felt a little guilty leaving the store with a sack full of garments manufactured in another country.
Finally, we purchased a few other small products including a clip-on lamp for Jeff's classroom and a couple of bracelets / earrings as accessories. Again, we couldn't locate American made options in our local stores. This is not to say they don't exist, but if stores where we shop don't carry something made in the U.S.A., it is much more difficult to purchase it. We don't always have the luxury of ordering online or devoting an hour or two to researching brand names. Overall, I feel like we're in the midst of a consumer Catch-22 because we want to support the economy by purchasing needed goods, but we don't want to send our money to another country. In addition, more people would buy American goods if they were easily available, but not enough people bought them at some point so they're no longer on local shelves. Ultimately, we'll keep trying to buy items made in America, but the frustration is taxing.
The only products we came home with that I'm certain were produced in the United States are the boy's contact lenses. Some online research this morning (before we left) indicated that many of today's disposable brands come from American facilities. Bausch and Lomb (founded in 1853), Johnson and Johnson (maker of my brand - Acuvue), and Cooper Vision all make their products in the U.S. of A. CIBA Vision, a company based in Switzerland, also has production facilities here as well as many other countries around the world. Thus, I knew we had scored one for the red, white, and blue when we left the house. However, the new glasses were another story entirely.
My online research yielded many companies that manufacture and distribute glasses frames and lenses, but most did not specify brand names. To compound the situation, the companies I read about also imported some brands and distributed those alongside their own products. Italy seems to be an especially popular country for eye wear exports to the U.S. In addition, none of the frames we looked at were marked with a specific company or country, (mostly because we didn't buy designer frames). Our assumption is that these frames were not created here, though we did purchase the glasses and contacts from Eye Masters, a private corporation based in San Antonio. (The company is a subsidiary of Eye Care Centers of America, which was founded in Texas in 1988.)
We finished glasses shopping feeling we had done our best to buy American, though we didn't really have enough information to guide us or enough choices to make the option feasible. Next, we spent some of our dollars on lunch at Panda Express (an American company that originated in California in 1973) and Steak Escape (an Ohio company founded in 1982). Both of these fast food joints are available at our local mall which, of course, employs our neighbors and students.
Next came shirt shopping for Jeff, but this portion of our day yielded zero satisfaction in the American-made department. Every dress shirt we looked at in J.C. Penney, Macy's, Dillard's, and Kohl's was made elsewhere - Taiwan, China, Bangladesh, Vietnam, Cambodia, etc. (At Kohl's I decided to browse through the women's clothes as well, but I couldn't find anything made in the U.S.A. - not even the Levi's which came from Mexico or Indonesia depending on the style. Lee jeans didn't present a better choice either, since they, too, came from overseas. As a matter of fact, every major jeans brand I looked at was made somewhere other than America - including Kenya, Egypt, Nicaragua, Bolivia, and Costa Rica.) Eventually, the necessity of having decent dress shirts for work won out over our frustrated endeavors to buy U.S. goods, but we felt a little guilty leaving the store with a sack full of garments manufactured in another country.
Finally, we purchased a few other small products including a clip-on lamp for Jeff's classroom and a couple of bracelets / earrings as accessories. Again, we couldn't locate American made options in our local stores. This is not to say they don't exist, but if stores where we shop don't carry something made in the U.S.A., it is much more difficult to purchase it. We don't always have the luxury of ordering online or devoting an hour or two to researching brand names. Overall, I feel like we're in the midst of a consumer Catch-22 because we want to support the economy by purchasing needed goods, but we don't want to send our money to another country. In addition, more people would buy American goods if they were easily available, but not enough people bought them at some point so they're no longer on local shelves. Ultimately, we'll keep trying to buy items made in America, but the frustration is taxing.
Tuesday, July 5, 2011
A Day Off
Sometimes little things can be the most frustrating to deal with. I have multiple choice philosophy for such days: A) When the going gets tough, the tough go shopping. B) When the going gets tough, the tough eat something delicious. C) Both of the above. Yup, today was a choice C kind of day, so I took the boy out for lunch at our favorite California Mexican place (Rubio's) where we devoured fish tacos with smoky chipotle sauce (me) and overstuffed bean burritos loaded with cheese (Jade). Next, we headed to Hobby Lobby's big sale to hunt for home decor. Take a look at our finds!
After lunch and shopping, I felt immensely better and we headed home. While Jade worked on his online class, I put all the purchases in place. Then to cap off the day, we decided cookies were in order. (OK, I decided, but he'll eat most of them!) My first thought was to make jam thumbprints with some of the fig jam from last week, but then I spied the snicker doodle recipe. As I rolled the dough into little balls, it occurred to me to combine the two ideas and press thumbprint indentations into the snicker doodles. However, since I didn't refrigerate the dough first, the shape didn't hold. Not to be discouraged, I pulled a can of cream cheese frosting from the pantry and mixed in a good portion of fig jam. (I couldn't tell you how much since I just kept added jam until the icing tasted distinctly of figs.) Once cooled, the cookies became wonderful little sandwiches. Soft and cinnamon-y cookies, cream cheese and fig filling - what's not to like? This filling would be great between layers of spice cake, too. It might even be the type of filling Jeff is enjoying so much in Viennese tortes since it has the creaminess of good icing, but the taste of fruit. Overall, the day may have had a rocky start, but it had a sweet ending.
 |
| Since white vinyl decals are hard to come by, I decided some soft colors that play well with the pale blue would look good. In addition to adding some whimsy to the space, these afford a couple more choices for towel colors. |
 |
| Here's the artwork I picked up for the guest bath wall. I have been torn between something with muted, romantic colors and something with a more graphic quality. This just seems tailor made for the space from its dark brown tree, to its bright white background and lone touch of blue. (And who could resist a bird in a tree?) |
 |
| Next, these sconces caught my eye. I fancied they looked like stylized bird cages, and so I just had to bring them home, too. |
 |
| My final purchase of the day came in the floral department. I've spent the last two weeks looking for something to put in these aged vases that used to live on the fireplace. (Once the new coat of white when on, their creamy beige just didn't seem to look right, so they have a new home in our bedroom. The combination of silk flowers with the assorted dried grasses seems to be just the right amount of drama for the space. |
After lunch and shopping, I felt immensely better and we headed home. While Jade worked on his online class, I put all the purchases in place. Then to cap off the day, we decided cookies were in order. (OK, I decided, but he'll eat most of them!) My first thought was to make jam thumbprints with some of the fig jam from last week, but then I spied the snicker doodle recipe. As I rolled the dough into little balls, it occurred to me to combine the two ideas and press thumbprint indentations into the snicker doodles. However, since I didn't refrigerate the dough first, the shape didn't hold. Not to be discouraged, I pulled a can of cream cheese frosting from the pantry and mixed in a good portion of fig jam. (I couldn't tell you how much since I just kept added jam until the icing tasted distinctly of figs.) Once cooled, the cookies became wonderful little sandwiches. Soft and cinnamon-y cookies, cream cheese and fig filling - what's not to like? This filling would be great between layers of spice cake, too. It might even be the type of filling Jeff is enjoying so much in Viennese tortes since it has the creaminess of good icing, but the taste of fruit. Overall, the day may have had a rocky start, but it had a sweet ending.
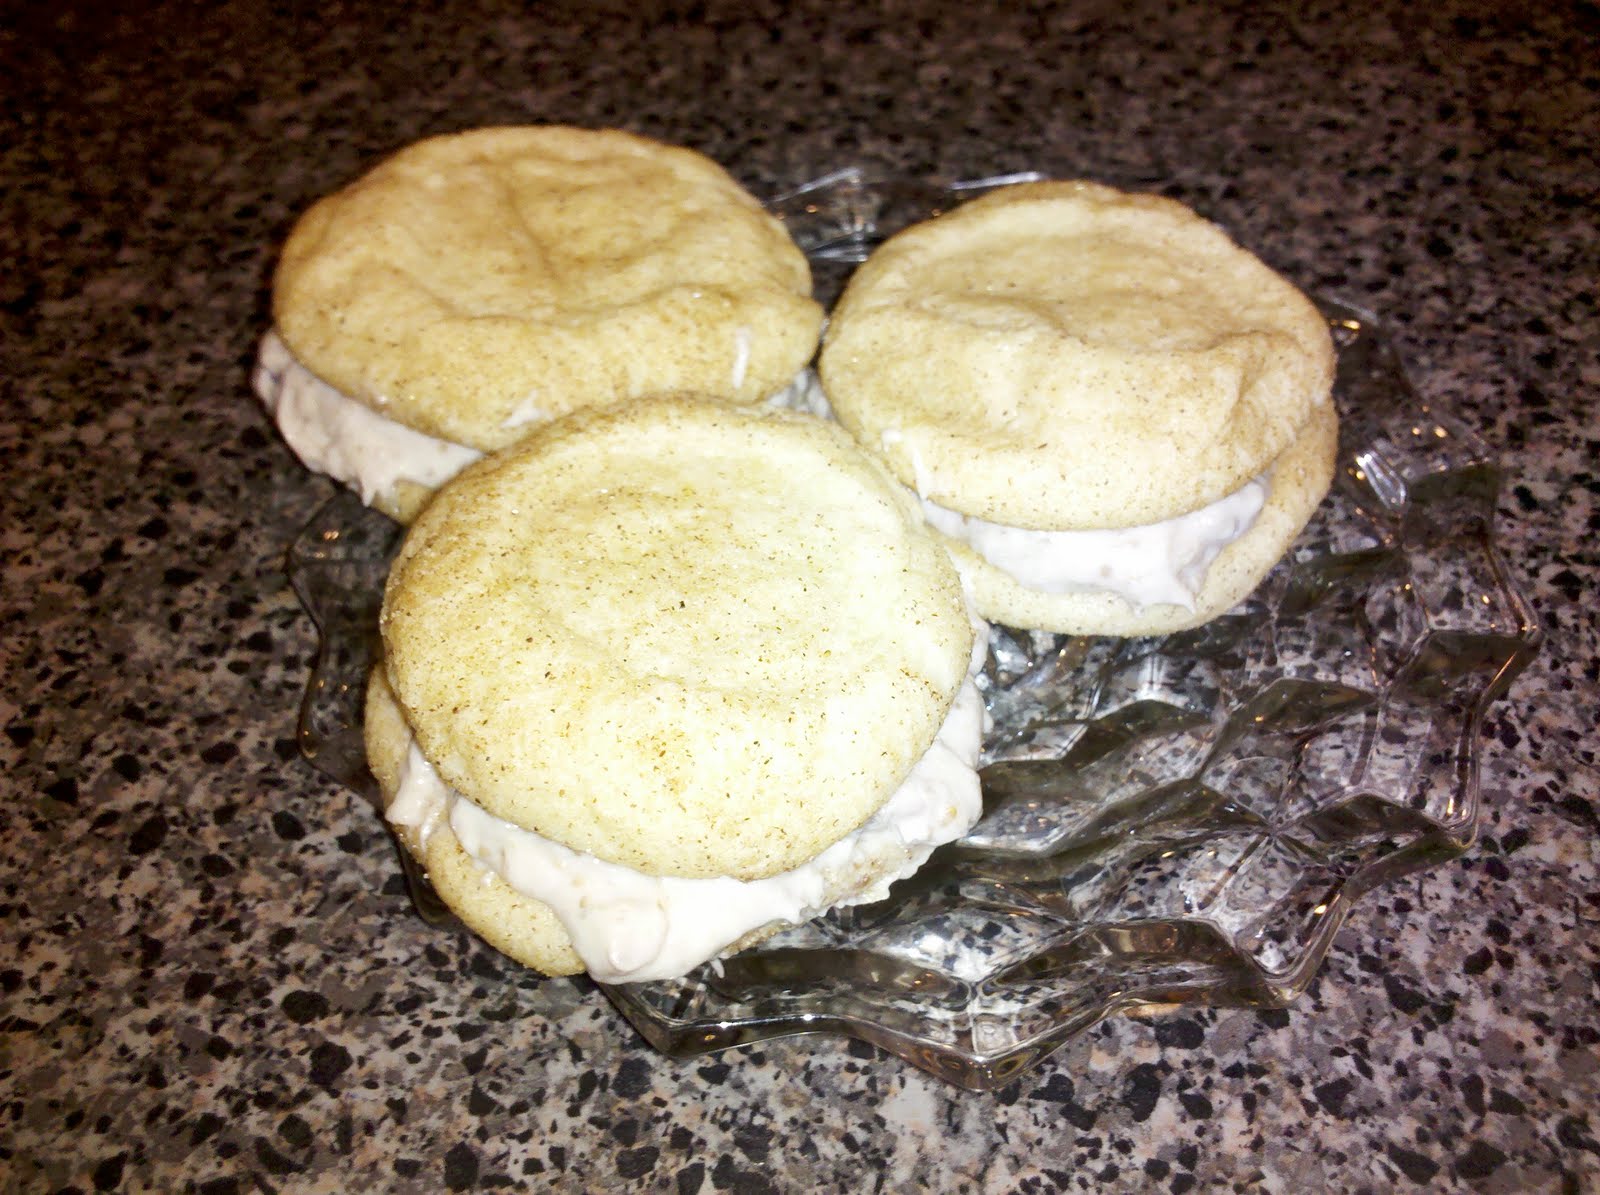 |
| Snicker doodles with cream cheese and fig filling |
Monday, July 4, 2011
Still Painting
As I write, the 12-hour top coat wait time has begun on the lower kitchen cabinets. (Hooray!) This means that tomorrow I'll be able to replace the fronts (and all the pots, pans, and utensils that are in boxes in my living room) and begin the final section - the upper cabinets. I'm anticipating and dreading this part because I'll have to stand on a step ladder to reach the top, but I'm almost done with the required painting. Don't get me wrong, I won't be finished painting since I have a dining table and china hutch to go, but if one of those doesn't get done before Jeff's welcome home party, it's not a big deal. I have to admit, living with the disarray is wearing on my nerves, but I'm happy to be able to see the end. I'm also happy with the results.
Of course, as painting continues so do some smaller projects. The last couple of days I have cut out fabric for eight place mats in a simple pieced quilting design. The first set of four is made from a heart of hearts block with (of course) graduated hearts appliqued to the front. The second set of four is made from a windmill block that consists of strips of fabric turned in different directions. Cutting out the pieces was pretty simple once I made a set of card stock templates. (I realize this is elementary for all you quilters, but I'm new to the craft.) I'll be posting photos of those as I stitch them up (tomorrow?). For now, I'm calling it a night to enjoy some fireworks and a glass of wine (which reminds me of a wine bottle project I want to get started on as well).
 |
| My dining room has become project central. |
 |
| Half of my cabinets are empty, making it feel like moving day! |
 |
| This is the finished product in the guest bath. I still need to accessorize, but the basics are there. |
 |
| I couldn't decide whether to paint it white or brown, but after an initial coat of white, I decided brown is the better choice. (Guess I should have listened when Mom said it would be.) I'm still looking for some vinyl wall stickers to apply to the doors, but white ones are hard to come by since the manufacturer seems to assume everyone has light colored walls. (ha!) |
 |
| Here's the main attraction - kitchen island - in black and white. You can see the original cabinet color in the background (though that view will be very different come tomorrow morning). I'm contemplating a black vinyl design on each door and some pretty hardware (retro glass handles or maybe something in wrought iron). |
Sunday, July 3, 2011
Figs Galore
When Charles Dickens wrote, "Train up a fig tree in the way it should go, and when you are old sit under the shade of it," he neglected to mention having to deal with the fruit in the meantime. Don't get me wrong; I'm not complaining about how prolific my lovely (not so) little tree is, only about its timing. Figs are delicate morsels that must be eaten or cooked within a day or two of picking or they begin to shrivel (which means, I suppose, that it's time to get out the dehydrator). So last night, after I put the guest bath and kitchen island cabinets back together and everything back in the drawers, etc. I decided I'd better cook some figs.
Of course, finding my jar stash to be nearly nil, I had to make a quick run to Wally World for supplies. At the time, the quart jars looked like the way to go - plenty of room for all those figs. After filling some of them, however, I see that pint jars are probably a better choice for portion control during later use. (Live and learn!) I also discovered that the largest pot I own accommodates only four pounds of figs with their accompanying liquid/syrup. This severely restricted the process since I had to make something, wash the pot, and start over each time. (I feel a VERY large pot coming home in the near future.) I wanted to use eight pounds of fruit to make the pickled figs, but ended up with only the four that would fit. Since they take awhile to make, it becomes problematic to produce small batches. Though, the smell was heavenly and the small amount of syrup left over at the end, delicious! It reminded me of cinnamon crab apples I've eaten somewhere down the line. Even today, I'm staring at the beautiful jars thinking I should just open one and dig in, but I'm trying to practice restraint until fall when all the fresh fruit is gone.
Once the pickled figs were in the jars, I decided fig chutney (one of my personal favorites) should be next on the menu. Another four pounds of quartered figs went into the pot along with other yummy ingredients like chopped onions, cinnamon, all spice, and ginger. This too has to simmer for quite a long time, so I contemplated what to do with the remaining four pounds but decided to quit for the night by the time the chutney finished bubbling. So, here's the tally for the week: four pounds of figs into jam, four pounds of figs pickled, four pounds of figs into chutney, four pounds of figs still in the fridge, and four pounds of figs eaten fresh and given to a neighbor. Judging from the size and color of the fruit remaining on the tree, I have about a week's reprieve before the next harvest begins. (I'm actually hoping for two weeks, but that's selfish.)
Anyone want to trade some pickled okra or canned salsa for figs? I think I'll have plenty.
Of course, finding my jar stash to be nearly nil, I had to make a quick run to Wally World for supplies. At the time, the quart jars looked like the way to go - plenty of room for all those figs. After filling some of them, however, I see that pint jars are probably a better choice for portion control during later use. (Live and learn!) I also discovered that the largest pot I own accommodates only four pounds of figs with their accompanying liquid/syrup. This severely restricted the process since I had to make something, wash the pot, and start over each time. (I feel a VERY large pot coming home in the near future.) I wanted to use eight pounds of fruit to make the pickled figs, but ended up with only the four that would fit. Since they take awhile to make, it becomes problematic to produce small batches. Though, the smell was heavenly and the small amount of syrup left over at the end, delicious! It reminded me of cinnamon crab apples I've eaten somewhere down the line. Even today, I'm staring at the beautiful jars thinking I should just open one and dig in, but I'm trying to practice restraint until fall when all the fresh fruit is gone.
Once the pickled figs were in the jars, I decided fig chutney (one of my personal favorites) should be next on the menu. Another four pounds of quartered figs went into the pot along with other yummy ingredients like chopped onions, cinnamon, all spice, and ginger. This too has to simmer for quite a long time, so I contemplated what to do with the remaining four pounds but decided to quit for the night by the time the chutney finished bubbling. So, here's the tally for the week: four pounds of figs into jam, four pounds of figs pickled, four pounds of figs into chutney, four pounds of figs still in the fridge, and four pounds of figs eaten fresh and given to a neighbor. Judging from the size and color of the fruit remaining on the tree, I have about a week's reprieve before the next harvest begins. (I'm actually hoping for two weeks, but that's selfish.)
Anyone want to trade some pickled okra or canned salsa for figs? I think I'll have plenty.
 |
| Start here - with fresh, ripe figs |
 |
| Fig jam |
 |
| Pickled figs |
 |
| Fig chutney |
Friday, July 1, 2011
Hanging in There
I've always been a little clumsy, and home improvement projects tend to bring out my inner klutz. In the last two weeks I've bumped my head (twice), banged and bruised my knee, smashed my toe, squished my finger, broken every nail I have, and stepped on an industrial size plug with bare feet. Rest assured, none of these mishaps has caused any serious injury, but I have kindled a close friendship with ibuprofen. Still, minor injuries only create momentary setbacks as projects continue to move forward. Today (I'm happy to report.) I put the top coat on the cabinetry for the guest bath and kitchen island. This means that tomorrow morning (after the final 12 hour drying time elapses), I can replace the doors, admire my handy work for a few moments, and move on to the lower kitchen cabinets.
In the meantime, I managed to accomplish only a couple of small projects today (mostly because the boy and I goofed off for several hours this morning). First, I picked up some trim to finish off the tea cup niche which I covered with black and white toile fabric yesterday. I must say, the trim really sets off the fabric and the shape of the niche, making the project look polished and professional.

Next, I decided to install a spice rack I picked up at Walmart for a mere $12. This rack is particularly nifty in that it swivels down from the shelf to allow full view and easier access to the spices at the back of the cabinet. My only complaint is that some of my (mismatched) jars were too tall for the back rack, which left me with two options: raise the shelf above the rack, place the taller bottles in the front. Option one seemed out of the question since I couldn't budge the shelf supports (those silly little plastic ones that click in place and require huge amounts of pressure concentrated into nimble fingers). But once I moved the taller items to the front, all worked well.
The installation was pretty easy since it consisted of attaching a bracket to the bottom of the cabinet, slipping the rods on the back of the rack into the bracket, and then attaching the one on the other side. I have to admit, though, I had a couple of minor setbacks. First, I did not have the hand strength to simply screw the brackets into the wood. "Aha!" I thought, "I'll use Jeff's drill to create pilot holes!" However, the drill was too large to fit under the shelf above (and as I previously noted, there wasn't any way in Hades I could make it move). So, I decided to use a nail to create a small starter hole. (Eureka!) This worked like a charm and the screws when right into the cabinet base at last. (Yes, stick-to-it-ness prevailed again.) All in all, the whole thing took less than 30 minutes - even with the delays. Take a look at the finished project.
In the meantime, I managed to accomplish only a couple of small projects today (mostly because the boy and I goofed off for several hours this morning). First, I picked up some trim to finish off the tea cup niche which I covered with black and white toile fabric yesterday. I must say, the trim really sets off the fabric and the shape of the niche, making the project look polished and professional.

Next, I decided to install a spice rack I picked up at Walmart for a mere $12. This rack is particularly nifty in that it swivels down from the shelf to allow full view and easier access to the spices at the back of the cabinet. My only complaint is that some of my (mismatched) jars were too tall for the back rack, which left me with two options: raise the shelf above the rack, place the taller bottles in the front. Option one seemed out of the question since I couldn't budge the shelf supports (those silly little plastic ones that click in place and require huge amounts of pressure concentrated into nimble fingers). But once I moved the taller items to the front, all worked well.
 |
| Here's the rack tucked neatly inside the cabinet. I centered it so that side space could be used for larger items like salt containers, extract bottles, etc. |
 |
| Here's how the rack looks when it swivels down. Cool, huh? |
The installation was pretty easy since it consisted of attaching a bracket to the bottom of the cabinet, slipping the rods on the back of the rack into the bracket, and then attaching the one on the other side. I have to admit, though, I had a couple of minor setbacks. First, I did not have the hand strength to simply screw the brackets into the wood. "Aha!" I thought, "I'll use Jeff's drill to create pilot holes!" However, the drill was too large to fit under the shelf above (and as I previously noted, there wasn't any way in Hades I could make it move). So, I decided to use a nail to create a small starter hole. (Eureka!) This worked like a charm and the screws when right into the cabinet base at last. (Yes, stick-to-it-ness prevailed again.) All in all, the whole thing took less than 30 minutes - even with the delays. Take a look at the finished project.
 |
| Here is everything resting neatly inside the cabinet. |
 |
| The downward swivel provides easy access to items in the back. |
Thursday, June 30, 2011
Work Progresses
While I continue to paint kitchen and bathroom cabinetry, smaller projects fill the paint drying time. Today I accomplished two such tasks: recovering our bathroom seating and decorating the kitchen niche.
Our bathroom, like many in the neighborhood, contains a large garden tub which looks luxurious, but isn't very practical. Generally, it takes far too much hot water to fill and we have a spa in the backyard that affords a view of the early night sky. Thus, we don't use our tub and long ago Jeff upholstered a piece of MDF to create a seating (and storage) area where the tub sits. This is an ideal place to spread out accessories or put on shoes in the morning. However, the recent paint job in icy blue, left the red and gold fabric looking out of place. So, today's task was to recover it in a brown and blue paisley that contributes to the feeling of luxury. Take a look.
Our bathroom, like many in the neighborhood, contains a large garden tub which looks luxurious, but isn't very practical. Generally, it takes far too much hot water to fill and we have a spa in the backyard that affords a view of the early night sky. Thus, we don't use our tub and long ago Jeff upholstered a piece of MDF to create a seating (and storage) area where the tub sits. This is an ideal place to spread out accessories or put on shoes in the morning. However, the recent paint job in icy blue, left the red and gold fabric looking out of place. So, today's task was to recover it in a brown and blue paisley that contributes to the feeling of luxury. Take a look.
 |
| Here's the old upholstery with a fruit motif in reds and golds. |
 |
| Here's how the tub looks sans cover. As you can see, we use it to store "wet" items like the steamers I need during bronchitis season. |
 |
| Here it is with the new fabric and some pillows. While this photo makes the fabric look red, I assure you that it is blue and brown. |
 |
| Here's a close up of the fabric. The flash still doesn't do the color justice. :( |
 |
| Finally, the afternoon sun shows the colors better! Here you can see that it is kitty tested and approved by Bandit and Licorice. Once this project was complete, I put another coat of paint on the cabinet doors and moved on to the niche in the kitchen. Following a friend's advice, I decided to cover the niche with fabric. Some research online pointed towards using starch to adhere the fabric to the wall without nails, etc. Unfortunately, I didn't have any starch and (I couldn't believe it) I was out of corn starch in the pantry! So, after a quick jaunt to Walmart, I was underway. Unfortunately, the liquid starch did not hold the fabric to the wall very well. After about 40 minutes of frustration over moving pieces, falling pieces, dry pieces, and not sticking pieces, I decided to resort to teacher mode and use a stapler. After all, I'm going to cover the edges with trim! I stapled the fabric as close to the edge as possible, and smoothed as I went. Another hitch in my giddy up occurred, though, when I reapplied the screws to hang the teacups. This seemed to pull the fabric loose on one side and I managed to send a cup and saucer tumbling to the floor when I tried to straighten it. (Note to self: always remove the teacups before fiddling with the fabric.) Luckily, I have others to replace the broken one (which I glued together and plan to use as a soap dish or candle holder). Suffice it to say, I was not happy with this project even though the end result looks pretty good. Tomorrow I plan to pick up some flat edged trip to hot glue around the fabric to give it a finished look. Here's what I have for now, though. The photos show the niche before fabric, with fabric only (when it looked its best), and with teacups (after I moved the fabric around screwing in the holders (which I painted black).    |
Tuesday, June 28, 2011
Still in the Kitchen
Today I began revamping the kitchen cabinets, starting with the island (and the nearby bathroom cabinet). Since the project requires a few hours of drying between each coat, there was plenty of time to accomplish other tasks.
First on the list - hanging art. I recently purchased some blue-based prints featuring birds and flowers. (I'm just crazy about the bird motifs these days. I love the play of fresh colors with organic designs.) I bought a small pair for the kitchen (which I intended to hang over the sink, but changed my mind.) and another, fancier set for the archway - which ended up flanking the piano instead. (What can I say, I got them home and decided they'd be prettier elsewhere.) The pictures don't really do the pieces justice since the color isn't as clear. Suffice it to say they were a steel at $25 each from Ross. (The small ones were a bargain, too, at $12 a piece.) The little ones were also a good deal easier to hang since they only required a couple of small nails leveled out for balance. The larger ones, however, required plenty of measuring for the correct height and distance from the piano. In addition, they had hangers a couple of inches in from the edges, which makes life fun.
![]()
![]()
![]()
In addition to these babies, I hung a black metal tray above my teacup display. (Mind you, it was gold and red before, but thanks to the wonders of spray paint it is completely transformed.) Prior to the current wall color, the niche where the teacups hang was a painted in a garnet red to accent the gold walls. Now, however, I'm not sure what color to paint it. I think white might not contrast enough (and certainly wouldn't set off the teacups) but black seems harsh. Brown doesn't really fit in with the kitchen area, while a darker shade of blue might look too much like a child's room. Hmmm...decorating dilemmas abound at my house!
In addition to putting some stuff on the walls, I decided to actually use my lovely kitchen for cooking. Dinner consisted of my take on oven spaghetti (pasta with a yummy sauce, covered in cheese, and baked until it's gooey) which made the boy pretty happy. (Let's face it, this kind of thing pleases just about everyone one.) I also used the remaining figs from last year's harvest coupled with the large bowl I picked a couple of days ago to make fig jam (at my mother-in-law's request). Since my mom clued me in last year on how easy it is to make jam, my family asks for it frequently. In this version, I only quartered the figs which left them in beautiful chunks throughout the sticky sweetness. Finally, while the jam boiled, I whipped up some baked chips from flatbread. (The store was out of whole wheat pitas when I was there, so I purchased a sun-dried tomato flatbread on sale.) While it was not as easy to cut as the pitas because the moisture content was a good deal higher, it made lovely chips to go with the remainder of my homemade hummus. All-in-all, I'd say it has been a pretty productive day!
First on the list - hanging art. I recently purchased some blue-based prints featuring birds and flowers. (I'm just crazy about the bird motifs these days. I love the play of fresh colors with organic designs.) I bought a small pair for the kitchen (which I intended to hang over the sink, but changed my mind.) and another, fancier set for the archway - which ended up flanking the piano instead. (What can I say, I got them home and decided they'd be prettier elsewhere.) The pictures don't really do the pieces justice since the color isn't as clear. Suffice it to say they were a steel at $25 each from Ross. (The small ones were a bargain, too, at $12 a piece.) The little ones were also a good deal easier to hang since they only required a couple of small nails leveled out for balance. The larger ones, however, required plenty of measuring for the correct height and distance from the piano. In addition, they had hangers a couple of inches in from the edges, which makes life fun.
 |
| These now adorn the kitchen entrance. |


In addition to these babies, I hung a black metal tray above my teacup display. (Mind you, it was gold and red before, but thanks to the wonders of spray paint it is completely transformed.) Prior to the current wall color, the niche where the teacups hang was a painted in a garnet red to accent the gold walls. Now, however, I'm not sure what color to paint it. I think white might not contrast enough (and certainly wouldn't set off the teacups) but black seems harsh. Brown doesn't really fit in with the kitchen area, while a darker shade of blue might look too much like a child's room. Hmmm...decorating dilemmas abound at my house!
 |
| Here's the tray above the niche. |
 |
| Here's the niche - now looking rather non-descript. |
 |
| One pan full of gooey deliciousness for dinner |
 |
| Freshly browned flatbread chips |
 |
| Five jars of lovely fig jam |
Monday, June 27, 2011
Delicious Changes
Today's projects revolved around food, though not in the normal sense. Rather than cooking something fabulous (which I've been considering), I decided to make our eating spaces fabulous, instead. I cheated a little and bought some new chairs for our kitchen table at Ikea yesterday. The old chairs are going to Goodwill in hopes that someone more skilled than Jeff can give them new life. (Seriously, these chairs are really wobbly, and every time a guest sat in one I was afraid it might fall apart! Jeff fixed them repeatedly, but the last year or so he hasn't been able to make any progress with them.) Luckily for me, tall and shaggy knows how to follow Ikea picto-grams and use basic hand tools to put the chairs together after a morning trip to the grocery store. (By the way, can I tell you how much I love shopping on Monday morning! It's one of the best things about summer break!)
Once the chairs were together, I had to find a way to spruce up the table as well. It occurs to me that the before photo doesn't really show all the flaws with the glass top. First, we used it outside for awhile (at another house) and it became a little sand blasted with small abrasions on in. In addition, when we purchased this table (ump-teen years ago), we thought it would be easy to take care of since it is glass. (Just wipe it off, right?) Of course, the trouble is you have to wipe it off every 10 minutes! Suffice it to say, I've been itching to get rid of that table for awhile - and that was the plan. However, after looking at the money for paint, accessories, etc., I decided we couldn't afford to put in a new kitchen island (read much larger with a bar seating area) at this point. Thus, the old table has to stay awhile longer. Enter contact paper. That's right, as I was strolling through Home Depot (waiting for my cabinet paint to be mixed) I stumbled across a display of contact paper in a myriad of forms. (The stainless steel was really cool, but didn't seem to go with our decor!) I decided that $6.50 was a small price to pay for a new table top that I didn't have to flip and paint from the bottom (which was my first intention). The one I chose looks like black leather and feels pretty soft to the touch, giving the initial impression that the table has been upholstered. While it took a little patience to get out ALL the air bubbles, the end result is pretty great - especially with my new chairs.
While I was working on chairs and tables, the dining seats called to me. These are sturdy metal chairs with a cushion attached by several screws. They've been recovered numerous times, but this project got a twist because I decided to paint the frames as well. I purchased Rust-leum Painter's Touch spray paint. It promised double coverage, and at only $3 a can, was one of the least expensive options. To be on the safe side, I bought four cans, but only needed about two and a half. While I don't know that the it actually covered twice as much as a "normal" can of spray paint, I didn't have to go back for a second coat and the finish dried to a nice, glossy black. However, the best thing I bought for this project was a trigger sprayer for paint cans. This little plastic gadget was $2.50 well spent. It clips to the top of a spray paint can and creates a sprayer with a trigger that is much easier to hold and control. In addition, the trigger - which can accommodate two fingers - saved my index finger from a good deal of pain and swelling. If you're going to paint anything large, invest in one of these!
In addition to painting the frames, I put some fresh new fabric on the seats. After posting photos of several swatches, Jeff and I chose a modern floral print. Eventually, the dining table (which is pretty scratched up) will get a coat of white paint to match the cabinets, but for now it is a staging area for other projects. I can't help but imagine how beautiful it wall all be when it's done.
Once the chairs were together, I had to find a way to spruce up the table as well. It occurs to me that the before photo doesn't really show all the flaws with the glass top. First, we used it outside for awhile (at another house) and it became a little sand blasted with small abrasions on in. In addition, when we purchased this table (ump-teen years ago), we thought it would be easy to take care of since it is glass. (Just wipe it off, right?) Of course, the trouble is you have to wipe it off every 10 minutes! Suffice it to say, I've been itching to get rid of that table for awhile - and that was the plan. However, after looking at the money for paint, accessories, etc., I decided we couldn't afford to put in a new kitchen island (read much larger with a bar seating area) at this point. Thus, the old table has to stay awhile longer. Enter contact paper. That's right, as I was strolling through Home Depot (waiting for my cabinet paint to be mixed) I stumbled across a display of contact paper in a myriad of forms. (The stainless steel was really cool, but didn't seem to go with our decor!) I decided that $6.50 was a small price to pay for a new table top that I didn't have to flip and paint from the bottom (which was my first intention). The one I chose looks like black leather and feels pretty soft to the touch, giving the initial impression that the table has been upholstered. While it took a little patience to get out ALL the air bubbles, the end result is pretty great - especially with my new chairs.
 |
| Before - with the new Ikea chairs and scratch up glass |
 |
| After - with a smooth, durable surface |
While I was working on chairs and tables, the dining seats called to me. These are sturdy metal chairs with a cushion attached by several screws. They've been recovered numerous times, but this project got a twist because I decided to paint the frames as well. I purchased Rust-leum Painter's Touch spray paint. It promised double coverage, and at only $3 a can, was one of the least expensive options. To be on the safe side, I bought four cans, but only needed about two and a half. While I don't know that the it actually covered twice as much as a "normal" can of spray paint, I didn't have to go back for a second coat and the finish dried to a nice, glossy black. However, the best thing I bought for this project was a trigger sprayer for paint cans. This little plastic gadget was $2.50 well spent. It clips to the top of a spray paint can and creates a sprayer with a trigger that is much easier to hold and control. In addition, the trigger - which can accommodate two fingers - saved my index finger from a good deal of pain and swelling. If you're going to paint anything large, invest in one of these!
In addition to painting the frames, I put some fresh new fabric on the seats. After posting photos of several swatches, Jeff and I chose a modern floral print. Eventually, the dining table (which is pretty scratched up) will get a coat of white paint to match the cabinets, but for now it is a staging area for other projects. I can't help but imagine how beautiful it wall all be when it's done.
 |
| Before - in bronze, brown, and red tones |
 |
| After - looking fresh and sassy in classic black and white |
Sunday, June 26, 2011
Rustoleum Review
A few days ago I purchased Rustoleum's Cabinet Transformations kit to revamp the cabinetry in my bathrooms. The kit comes in dark base and light base which is tinted to match the color of your choice. Including glazed and unglazed finishes there are 48 color variations on the dark base. (Actually, the kit is tinted in 24 colors, but the glaze changes the basic color when applied to double the number of options.) The light colored kit (which I'll be using in the kitchen this week) comes in another set of variations ultimately providing a color for just about every decor.
Before purchasing the kit, I did some homework by reading quite a few reviews both on the Rustoleum website and by independent writers. The consensus was the process and directions were easy to follow, though time consuming. I agree with this assessment, but the large amount of time required is not because it takes forever to apply the product, but because each coat must dry before moving on to the next step. This isn't so bad when painting the cabinet frames, but the doors and drawer fronts have to be painted on the back (dry), front (dry), back (dry), front (dry) before glazing or applying the top coat (which dries for 12 hours before putting the cabinet back together.) That said, this is a simple process that yields excellent results.
In addition, the $80 kits goes pretty far. I completed a double sink cabinet in the master bathroom and am about to do a single cabinet in the guest bathroom without even using half of the materials. At this rate, I should be able to refinish my kitchen cabinets with only a couple of kits and have some left to work on my china cabinet, too. The finish looks smooth and professional, though I was worried after the first coat of paint/bonding agent. The coverage didn't look even and I was afraid I had ruined by cabinets, but once the second coat went on the color evened out completely.
The hardest part of the entire project was taking the cabinetry apart and putting it back together because the hardware fought me (and I couldn't get enough torque with the electric screwdriver). In addition, crawling around on the floor to paint the frame wasn't fun, but it wasn't really difficult, either. One lesson I learned is to be very careful on the edges of the doors and drawer fronts. The directions suggest putting the pieces on racks to make the edges easier to deal with and this helped a lot. However, since the racks take up space it limited the number of doors I could paint at one time (which isn't a big deal on the smaller bathroom cabinets but which will mean I'll have to do the doors in segments when I get to the kitchen). Also, be especially careful applying the top coat. It goes milky white and dries to a glossy clear coat, but if it pools in the corners it remains whitish instead of turning clear. In the end, if a mistake happens I think you could just sand it out and refinish that portion of the project.
Overall, I would recommend this product without reservation. It did a great job of making my cabinets look totally different at a reasonable price.
Before purchasing the kit, I did some homework by reading quite a few reviews both on the Rustoleum website and by independent writers. The consensus was the process and directions were easy to follow, though time consuming. I agree with this assessment, but the large amount of time required is not because it takes forever to apply the product, but because each coat must dry before moving on to the next step. This isn't so bad when painting the cabinet frames, but the doors and drawer fronts have to be painted on the back (dry), front (dry), back (dry), front (dry) before glazing or applying the top coat (which dries for 12 hours before putting the cabinet back together.) That said, this is a simple process that yields excellent results.
In addition, the $80 kits goes pretty far. I completed a double sink cabinet in the master bathroom and am about to do a single cabinet in the guest bathroom without even using half of the materials. At this rate, I should be able to refinish my kitchen cabinets with only a couple of kits and have some left to work on my china cabinet, too. The finish looks smooth and professional, though I was worried after the first coat of paint/bonding agent. The coverage didn't look even and I was afraid I had ruined by cabinets, but once the second coat went on the color evened out completely.
The hardest part of the entire project was taking the cabinetry apart and putting it back together because the hardware fought me (and I couldn't get enough torque with the electric screwdriver). In addition, crawling around on the floor to paint the frame wasn't fun, but it wasn't really difficult, either. One lesson I learned is to be very careful on the edges of the doors and drawer fronts. The directions suggest putting the pieces on racks to make the edges easier to deal with and this helped a lot. However, since the racks take up space it limited the number of doors I could paint at one time (which isn't a big deal on the smaller bathroom cabinets but which will mean I'll have to do the doors in segments when I get to the kitchen). Also, be especially careful applying the top coat. It goes milky white and dries to a glossy clear coat, but if it pools in the corners it remains whitish instead of turning clear. In the end, if a mistake happens I think you could just sand it out and refinish that portion of the project.
Overall, I would recommend this product without reservation. It did a great job of making my cabinets look totally different at a reasonable price.
 |
| Here's how the cabinet looked before the paint job. (I forgot to take a photo of the double cabinet in the master bathroom, but all the cabinets in the house are identical.) This one is actually next up for painting tomorrow morning. |
 |
| This is how the cabinet looked upon completion. I did find a couple of place I missed when applying the top coat, so when I do the next cabinet, I'll be touching those up, too. I'm considering adding some brushed nickel hardware to complete the transformation. |
 |
| This is the new paint in the guest bathroom. My son spent several days peeling the wallpaper off the lower section of walls. Once he was done, I added the chocolate brown below the molding. Once the cabinet is refinished, the bathroom will be complete except for accessories. (I purchased a pale blue seat cover and rug, but the cover doesn't fit. Alas!) |
Subscribe to:
Posts (Atom)